Now before you all get confused this isn't a post about health or beauty tips for your thumbnails, but rather about a little trick I sometimes use to improve the thumbnails Blogger generates for each post.
When you publish a post through Blogger not only does the post appear on your blog but Blogger also inserts the content into two news feeds (RSS and Atom formats) which people can subscribe to in order to know when you have published something new. These feeds are also used to fill in the blog list widget that many people include in their blog template; you can see mine under the heading "I'm Also..." on the right.
If you have included an image in your post, and the image is hosted by Blogger (i.e. has blogspot in the URL) then as well as putting the post content into the news feed Blogger will generate a small thumbnail to represent the post. It appears to do this by creating a 72 pixel square thumbnail from the first image in the post. Specifically it scales the image so that the short edge is 72 pixels long and then crops the other dimension to retain the middle of the image. You can see this working with the image of a Chinese tin of spam from one of my recent posts.
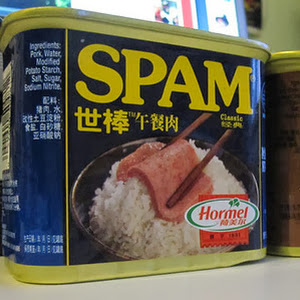
To make the images easier to see I've used a width of the 300 pixels instead of 72 but the result is the same. On the left you can see the original image sized to 300 pixels wide, whereas on the right we have a 300 pixel thumbnail generated by scaling the height first and then cropping the width. In this example the cropping isn't too bad as it has retained almost all of the important content, but you can easily imagine images where the cropping could result in thumbnails that were far from ideal; chopping off peoples heads is a common example.
Fortunately it is easy to control the thumbnail that is generated by ensuring that the first image in your post is already square and cropped to your satisfaction. Now of course that would often leave you with an image you don't actually want to use, but that is alright as my trick doesn't actually result in the image appearing in the post anyway.
To customize the thumbnail all you have to do is upload the square image you want to use (it can be any size although as it will always be displayed as a 72 pixel square there isn't much point making it too big) through the Blogger interface and then switch to the HTML editor view. Now we don't need all the HTML that Blogger generates as all we need is the img tag. So you can remove everything surround the image and move the rest to the very beginning of your post. So for this post that looks something like (I've trimmed the URL to fit the screen):
By placing this at the beginning of the post we ensure that this image is the one Blogger uses when it generates the thumbnail, and we can hide it for all other purposes by adding some CSS to the image as follows:
In this case the CSS is fairly self-explanatory as it simply turns off the display of the image. And that is it, a very simple trick but one that can make your blog look better in other peoples news feeds.
As well as using this to customize a thumbnail that Blogger would already generate you can of course use it to generate thumbnails in cases where Blogger otherwise wouldn't. The two main cases where this might be useful are firstly where you host your images somewhere else (maybe flicker) or, and this is where I most often use this trick, if you have embedded a YouTube video instead of an image in your post. In neither case does Blogger generate a thumbnail for you, but you should be able to see how easy it would be to add your own.
I've recently been building a simple proof-of-concept web application which may or may not see the light of day, but essentially it builds an SVG image directly within the browser through user interaction. One useful feature would be to allow the user to download the completed SVG file (as a backup or for use elsewhere). After quite a bit of experimentation with some of the newer HTML features I now have a (mostly) working solution, which I've reduced down to a simple example using the Kiwi to the left (the SVG for this image comes from a useful tutorial by Chris Coyier). If you can't see a Kiwi then your browser doesn't supporting displaying SVG images and certainly won't support the techniques in the rest of this post, so if you want to follow along you'll need to find a more modern browser.
Given that the SVG image is being built through standard DOM manipulation it is easy to get the text of the SVG file directly via JavaScript. For example, if we assume that the SVG element has the id svg then the following will get the full text of the image.
// get a copy of the DOM element with the id "svg"
var svg = document.getElementById("svg").cloneNode();

// get the text of this element, including the element and all children
var content = svg.outerHTML;

if (content == undefined) {
  // if there is no content then the outerHTML property isn't supported...

  // so create a new DIV element
  var div = document.createElement("div");

  // append the SVG to the DIV
  div.appendChild(svg);

  // use the widely supported innerHTML to get at the text of the SVG
  content = div.innerHTML;
}
This is a little more convoluted than I would like due to the fact that while all browsers support outerHTML not all of them (specifically Chrome) support it on the SVG element. Either way this code allows us to get the text we need to return as an SVG file to the user. Note that I've cloned the SVG node (line 2) rather than just referencing it directly, because changing a nodes parent in Chrome causes it to disappear from the document, which clearly isn't what we want. The more complex part of the problem then is figuring out how to return the text as an SVG to the user.
Given that I was looking at this in the context of a large web application, probably the easiest option would have been to send the text back to the server, which could then return it to the browser with a sensible filename and mime type (image/svg+xml), but this would clearly be rather inefficient, especially as the SVG image grows in size. It would also preclude the technique from being used in simple client side applications which didn't use a web server.
I stumbled upon an almost working example by accident. It turns out that if you simply return the SVG data from within a JavaScript href link the SVG will open within the browser, allowing the user to simply save the page to download the SVG. So we can wrap up the code above in a function:
function saveAsSVG(id) {
  var svg = document.getElementById(id).cloneNode();

  var content = svg.outerHTML;

  if (content == undefined) {
    var div = document.createElement("div");
    div.appendChild(svg);
    content = div.innerHTML;
  }

  return content;
}
And you can see what happens with this live version of the above. If you've just tried that you will have hopefully noticed a few problems:
the image is missing all it's colour information (the kiwi and grass are both black)
when you save the image the browser suggests a HTML filename
the file you save is actually a HTML file not an SVG as the browser adds some extra HTML wrapping
While these are all clearly problems I was encouraged that I was at least heading in roughly the right direction. The missing colours I had expected (and will come back to later) and so I focused on the final two related problems first. After searching the web I came across the HTML5 download attribute that the specification seemed to suggest was exactly what I needed. Essentially the new download attribute, when applied to a link, signals to the browser that the item the link points to should be downloaded rather than display. It also allows you to specify a filename that the browser should suggest when the user clicks the link. So using this with the above gets us:
which again you can try for your self with this live version of the above. Now I don't know which browser you are using, but I was developing this in Firefox, and I was amazed to find that this works; clicking the link pops up a "save as" dialog with the correct file name and the saved file is the correct SVG file. Unfortunately trying the same thing in both Opera and Chrome doesn't work. In Opera, the attribute seems to be simply ignored as it doesn't change the behaviour, while in Chrome when you click the link nothing happens, and no errors are reported. As far as Opera is concerned the problem seems to be that I'm running the latest version available for Ubuntu which is v12, while the most recent version for Windows and Mac is 18; so if Opera are abandoning Linux I'm going to abandon testing with Opera.
Now while I could mandate specific browser versions for the app I was working on I really did want to try and find a more general solution. Also I had noticed that even once you have saved the SVG in Firefox the throbber never stops spinning, which usually suggests that the browser isn't really happy with what you have just done! Fortunately the search that led me to the download attribute also pointed me at a related new HTML feature; the blob.
A blob"represents a file-like object of immutable, raw data. Blobs represent data that isn't necessarily in a JavaScript-native format", which sounds like exactly what I need, especially as a blob can be referenced by a URL. I'm not going to detail all the possible features or ways of using blobs, but the following single line of code can be used to create a blob from the SVG content we already know how to extract:
var blob = new Blob([content], {type: "image/svg+xml"});
If you remember from before the variable content holds the text of the SVG file we want to create, so this line creates a binary blob from the SVG data with the right mime type. It is also easy to create and destroy URLs that point to these blobs. For example, the following creates and then immediately destroys a URL pointing to the blob.
var url = window.URL.createObjectURL(blob);
window.URL.revokeObjectURL(url);
You can probably get away without explicitly revoking every URL you create as they should be automatically revoked when the page is unloaded, but it is certainly a good idea to release them if you know that a) the URL is invalid and b) you are creating a lot of these URLs. One thing to note is that Chrome (and other WebKit based browsers) use a vendor prefix for the URL object (i.e. it's called webkitURL) so we need to make sure that regardless of the browser we are using we can access the functions we need. Fortunately this is easy to do by adding the following line (outside of any function):
window.URL = window.URL || window.webkitURL;
So the remaining question is how do we string all these bits together so that clicking a link on a page, builds a blob, generates a URL and then allows the user to download the URL. All the solutions I saw while searching the web did this in two steps. Essentially they had a link or button that when clicked would build the blob, generate the URL, and then add a new link to the document. This new link would use the download attribute and the blob URL to allow the user to download the file. While this works it doesn't seem particularly user friendly. Fortunately it is easy to combine all this functionality into a single link.
The trick to doing everything within a single link is to use the onclick event handler of the link to build the blob and generate the URL which it then sets as the href attribute of the link. As long as the onclick event handler returns true then the browser will follow the href which now points at the blob URL and when we combine this with the download attribute the result is that the user is prompted to download the blob. So the function I came up with looks like the following:
function saveAsSVG(id, link) {

  if (link.href != "#") {
    window.URL.revokeObjectURL(link.href);
  }

  var svg = document.getElementById(id).cloneNode();

  var content = svg.outerHTML;

  if (content == undefined) {
    var div = document.createElement("div");
    div.appendChild(svg);
    content = div.innerHTML;
  }

  var blob = new Blob([content], {type: "image/svg+xml"});

  link.href = window.URL.createObjectURL(blob);

  return true;
}
Essentially this is just all the code we have already seen assembled into a single function, although it assumes that the initial href is # so that it doesn't try and revoke an invalid URL (from testing it seems that trying to revoke something that isn't valid is simply ignored, but this is slightly safer). We can then call this function from a link as follows:
And again you can try this for yourself using this live version of the above. Now this should work in all browsers that support these new HTML features which, according to the excellent Can I Use... website, should be most modern browsers. The only remaining issue is that the kiwi and grass are still both black in the downloadable SVG.
The reason the colour information is lost is that it was never part of the SVG to start with. In this example, the SVG is styled using CSS within the web page rather than directly within the SVG. When you download the SVG file you don't get the associated CSS styles and hence the elements revert back to being black. If we had used a self contained SVG image then everything would work and we would have no need to go any further. Fortunately, even when we style the SVG using CSS it is fairly easy to merge the styles into the SVG before the user downloads the image. In this example the page contains the following CSS style element.
Fortunately it is easy to add CSS styles to the SVG image before creating the blob object. If we assume that there is a function that returns a DOM style element then we can extend our existing function to embed this into the SVG as follows:
function saveAsStyledSVG(id, styles, link) {

  if (link.href != "#") {
    window.URL.revokeObjectURL(link.href);
  }

  var svg = document.getElementById(id).cloneNode();
  svg.insertBefore(getStyles(styles),svg.firstChild);

  var content = svg.outerHTML;

  if (content == undefined) {
    var div = document.createElement("div");
    div.appendChild(svg);
    content = div.innerHTML;
  }

  var blob = new Blob([content], {type: "image/svg+xml"});

  link.href = window.URL.createObjectURL(blob);

  return true;
}
Here you can see that on line 8 we call a function getStyles to get the DOM element and then append this as the first child of the root element of the SVG document, but the rest of the function is identical (other than the name as we can't overload functions in JavaScript). Now all we need to do is to define the getStyles function, which we do as follows:
function getStyles(names) {

  // create an empty style DOM element
  var styles = document.createElement("style");

  // set the type attribute to text/css
  styles.setAttribute("type","text/css");

  // get easy access to the Array slice method
  var slice = Array.prototype.slice;

  for (var i = 0 ; i < document.styleSheets.length ; ++i) {
    // for each style sheet in the document
    var sheet = document.styleSheets[i];

    if (names == undefined || names.indexOf(sheet.title) != -1) {
      // if we are including all styles or this sheet is one we want

      slice.call(document.styleSheets[i].cssRules).forEach(
        // slice the style sheet into separate rules
        function(rule){
          // create a new text node with the text of each CSS rule
          var text = document.createTextNode("\n"+rule.cssText);

          // add the rule to the style sheet we are building
          styles.appendChild(text);
        }
      );
    }
  }

  // return the completed style sheet
  return styles;
}
Hopefully the comments make it clear how this works, but essentially is finds all the rules within a named set of style sheets and adds them to a newly created style DOM element. It's worth noting that it is much safer to explicitly specify the style sheets you want to use because a) it will be quicker, b) the resultant file will be smaller but most importantly c) you can't access the content of style sheets loaded from another domain than the current page as this goes against the browser security model.
So given these new functions we can now use a link defined as follows to allow the kiwi to be downloaded in all it's glorious colours:
And again here is a live version of the above for you to try, which should allow you to download the full colour SVG.
Hopefully you have found this a useful and interesting exploration of some of the newer features of HTML, but it is worth noting that the techniques discussed could be used for downloading a whole range of different file types without requiring server interaction.
 GITHUB
 JENKINS
 DEMOS
DEMOS Now before you all get confused this isn't a post about health or beauty tips for your thumbnails, but rather about a little trick I sometimes use to improve the thumbnails Blogger generates for each post.
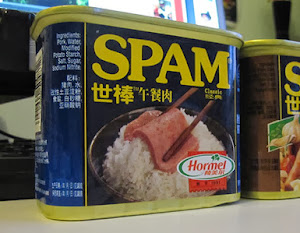
 I've recently been building a simple proof-of-concept web application which may or may not see the light of day, but essentially it builds an